> ## Documentation Index
> Fetch the complete documentation index at: https://documentation.outpost.pub/llms.txt
> Use this file to discover all available pages before exploring further.
# Event Creator
> Create reusable event HTML widgets with date, time, location, and pricing details that you can embed in Ghost posts.
export const PlanStatus = ({tier, status, beta, deprecated}) => {
const variants = {
luna: {
bg: "#8340B9",
color: "#ffffff",
border: "1px solid #8340B9"
},
voyager: {
bg: "#6B2FA0",
color: "#ffffff",
border: "1px solid #6B2FA0"
},
"space-station": {
bg: "transparent",
color: "#8340B9",
border: "1px solid #8340B9"
},
"all-plans": {
bg: "transparent",
color: "#525252",
border: "1px solid #a3a3a3"
},
labs: {
bg: "transparent",
color: "#a16207",
border: "1px solid #a16207"
},
beta: {
bg: "transparent",
color: "#a16207",
border: "1px solid #a16207"
},
"invite-only": {
bg: "transparent",
color: "#525252",
border: "1px solid #a3a3a3"
},
bespoke: {
bg: "transparent",
color: "#525252",
border: "1px solid #a3a3a3"
},
"outpost-hosted": {
bg: "transparent",
color: "#525252",
border: "1px solid #a3a3a3"
},
deprecated: {
bg: "transparent",
color: "#b91c1c",
border: "1px solid #b91c1c"
}
};
const chip = (variant, label) => {
const s = variants[variant] || variants["all-plans"];
return
{label}
;
};
const tierLabel = {
"luna": "Luna",
"voyager+": "Voyager+",
"voyager-luna": "Voyager + Luna",
"space-station+": "Space Station+",
"all-plans": "All plans"
};
const tierVariant = {
"luna": "luna",
"voyager+": "voyager",
"voyager-luna": "voyager",
"space-station+": "space-station",
"all-plans": "all-plans"
};
const statusLabel = {
"labs": "Labs",
"invite-only": "Invite-only",
"bespoke": "Bespoke",
"deprecated": "Deprecated",
"outpost-hosted": "Outpost Hosted"
};
return
{tier && chip(tierVariant[tier], tierLabel[tier])}
{status && chip(status, statusLabel[status])}
{beta && chip("beta", "Beta")}
{deprecated && chip("deprecated", "Deprecated")}
;
};
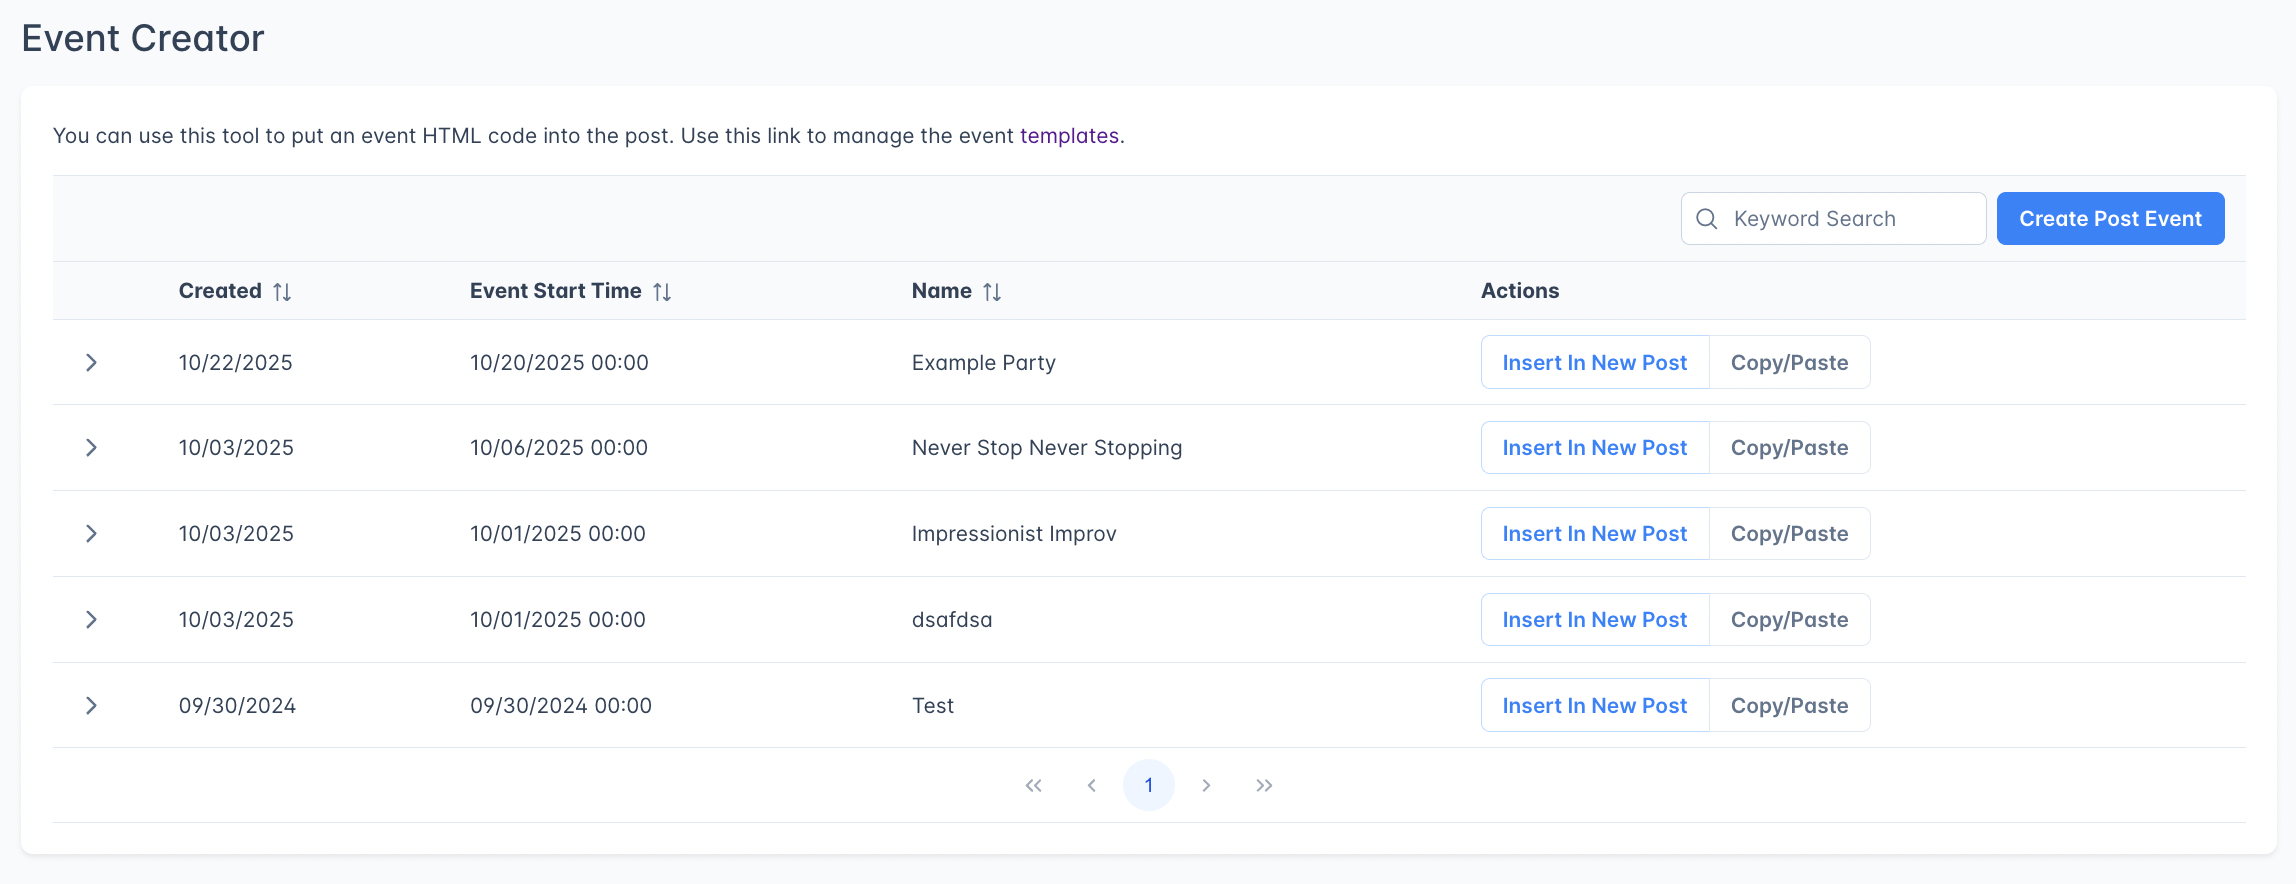
The Event Creator lets you build reusable event detail widgets (formatted HTML blocks with event date, time, location, type, and pricing) that you can insert into Ghost posts. Unlike the full [Events](/features/events) system, Event Creator is a simpler tool focused on creating and embedding event information without registration or attendee tracking.
 ***
## How it works
1. **Create** an event widget with details (name, date, time, location, price).
2. **Insert In New Post**: Outpost creates a new Ghost draft post. The widget HTML is added to the post's `codeinjection_foot`, and the post body starts empty. The event details render on your published site, not inside the Ghost editor.
3. Or **copy the embed code** to your clipboard and paste it into any existing Ghost post.
***
## Creating an event
Go to **Event Creator** in the left navigation and click **Create Post Event**.
### Event fields
| Field | Description |
| -------------------------- | --------------------------------------------------------------------------------------------------------------------------------- |
| **Name** | The event title. Required. |
| **Event Date** | The date of the event. |
| **Start Time** | Event start time (e.g., "10:00 am"). |
| **End Time** | Event end time (e.g., "6:00 pm"). |
| **Time Zone** | Choose from all major IANA time zones. |
| **Event Type** | The kind of event. Editable dropdown with three presets: "In-Person", "Webinar", "Virtual". You can type a custom value. |
| **Event Location Name** | Where the event takes place. Editable dropdown with one preset ("Online Listening Party"); type a custom value for anything else. |
| **Location Address** | Street address or additional location details. |
| **Registration Open Date** | When registration becomes available. |
| **Ticket Purchase Link** | URL to an external ticketing page (e.g., Eventbrite). |
| **Event Price** | Ticket price (with \$ prefix). Set to 0 for free events. |
### Templates
If you've created event templates, you can pick one instead of filling in every field manually. Templates are user-authored: click **Manage templates** on the Event Creator list page to create your own. Each template defines its own custom fields (text input, date, time, price, dropdown, timezone) and can carry default values.
If your publication has starter templates pre-configured by Outpost, those are also available in the dropdown when creating an event.
***
## Using event widgets
After creating an event, you have two options:
### Insert into a new post
Click **Insert In New Post** to create a new Ghost draft. Outpost places the rendered widget HTML into the post's `codeinjection_foot`; the post body starts empty. Open the draft in Ghost, add a title and your own copy, then publish. The widget renders on your live site.
### Copy and paste
Click **Copy/Paste** to copy the event embed code to your clipboard. Then paste it into any existing Ghost post.
***
## Editing events
Click any event row in the list to expand and edit it. Changes are saved in Outpost, but if you've already inserted or pasted the widget into a Ghost post, the existing post does not update automatically. You'll need to re-insert (creates a new draft) or re-copy and paste the updated HTML.
***
## Event Creator vs. Events
| | Event Creator | Events |
| ------------------------ | ------------------------------- | --------------------------------------- |
| **Purpose** | Embed event details in posts | Full event management with registration |
| **Registration** | No (link to external ticketing) | Built-in RSVP with attendee tracking |
| **Ghost integration** | Widget HTML in a Ghost post | Full post creation with metadata |
| **Attendee tracking** | No | Yes, with CSV export |
| **Lifecycle management** | No | Automatic status updates |
Use **Event Creator** for simple event announcements with external ticketing. Use [**Events**](/features/events) for events where you want built-in registration, attendee management, and calendar integration.
***
## Related features
Full event system with registration, attendee tracking, and Ghost integration.
Add conversion-focused calls to action alongside your event content.
***
## FAQ
Not through Outpost. Event Creator generates event detail widgets for display in posts; it doesn't handle registration. For registration, either link to an external ticketing service via the Ticket Purchase Link field, or use the full [Events](/features/events) system for built-in RSVP.
No. The HTML is embedded as a snapshot. If you update an event, you'll need to re-copy the HTML and update the Ghost post manually.
Yes. Click **Manage templates** on the Event Creator list page to create your own templates. Each template defines its own custom fields and default values, so a recurring event format only needs the variable details filled in each time.
***
## How it works
1. **Create** an event widget with details (name, date, time, location, price).
2. **Insert In New Post**: Outpost creates a new Ghost draft post. The widget HTML is added to the post's `codeinjection_foot`, and the post body starts empty. The event details render on your published site, not inside the Ghost editor.
3. Or **copy the embed code** to your clipboard and paste it into any existing Ghost post.
***
## Creating an event
Go to **Event Creator** in the left navigation and click **Create Post Event**.
### Event fields
| Field | Description |
| -------------------------- | --------------------------------------------------------------------------------------------------------------------------------- |
| **Name** | The event title. Required. |
| **Event Date** | The date of the event. |
| **Start Time** | Event start time (e.g., "10:00 am"). |
| **End Time** | Event end time (e.g., "6:00 pm"). |
| **Time Zone** | Choose from all major IANA time zones. |
| **Event Type** | The kind of event. Editable dropdown with three presets: "In-Person", "Webinar", "Virtual". You can type a custom value. |
| **Event Location Name** | Where the event takes place. Editable dropdown with one preset ("Online Listening Party"); type a custom value for anything else. |
| **Location Address** | Street address or additional location details. |
| **Registration Open Date** | When registration becomes available. |
| **Ticket Purchase Link** | URL to an external ticketing page (e.g., Eventbrite). |
| **Event Price** | Ticket price (with \$ prefix). Set to 0 for free events. |
### Templates
If you've created event templates, you can pick one instead of filling in every field manually. Templates are user-authored: click **Manage templates** on the Event Creator list page to create your own. Each template defines its own custom fields (text input, date, time, price, dropdown, timezone) and can carry default values.
If your publication has starter templates pre-configured by Outpost, those are also available in the dropdown when creating an event.
***
## Using event widgets
After creating an event, you have two options:
### Insert into a new post
Click **Insert In New Post** to create a new Ghost draft. Outpost places the rendered widget HTML into the post's `codeinjection_foot`; the post body starts empty. Open the draft in Ghost, add a title and your own copy, then publish. The widget renders on your live site.
### Copy and paste
Click **Copy/Paste** to copy the event embed code to your clipboard. Then paste it into any existing Ghost post.
***
## Editing events
Click any event row in the list to expand and edit it. Changes are saved in Outpost, but if you've already inserted or pasted the widget into a Ghost post, the existing post does not update automatically. You'll need to re-insert (creates a new draft) or re-copy and paste the updated HTML.
***
## Event Creator vs. Events
| | Event Creator | Events |
| ------------------------ | ------------------------------- | --------------------------------------- |
| **Purpose** | Embed event details in posts | Full event management with registration |
| **Registration** | No (link to external ticketing) | Built-in RSVP with attendee tracking |
| **Ghost integration** | Widget HTML in a Ghost post | Full post creation with metadata |
| **Attendee tracking** | No | Yes, with CSV export |
| **Lifecycle management** | No | Automatic status updates |
Use **Event Creator** for simple event announcements with external ticketing. Use [**Events**](/features/events) for events where you want built-in registration, attendee management, and calendar integration.
***
## Related features
Full event system with registration, attendee tracking, and Ghost integration.
Add conversion-focused calls to action alongside your event content.
***
## FAQ
Not through Outpost. Event Creator generates event detail widgets for display in posts; it doesn't handle registration. For registration, either link to an external ticketing service via the Ticket Purchase Link field, or use the full [Events](/features/events) system for built-in RSVP.
No. The HTML is embedded as a snapshot. If you update an event, you'll need to re-copy the HTML and update the Ghost post manually.
Yes. Click **Manage templates** on the Event Creator list page to create your own templates. Each template defines its own custom fields and default values, so a recurring event format only needs the variable details filled in each time.